Set-up, connection, live tracking, recording and playback, CSV output, super slow motion and focusing for the ROVI-EVS evaluation kit, which tracks moving people and vehicles in real time with an event camera.
1. Introduction
ROVI-EVS is an evaluation kit made of an event camera that outputs only the pixels that change (LUCID Triton2 EVS) and FLOYD processing software. It finds moving people and vehicles and shows their ID, box and speed in real time, and saves them to files.
Live tracking view — boxes, IDs, speed (px/s), trails and motion arrows
What an event camera is
A normal camera captures the whole picture at fixed intervals. In an event camera every pixel works on its own and sends a signal (an event) only when its brightness changes. Each event carries a position (x, y), a time in microseconds and whether the pixel got brighter or darker (polarity).
A still background produces no events, so there is no background to remove.
There is no exposure time, so fast motion does not blur.
The dynamic range is wide (over 120 dB), so targets are not lost against backlight or in low light.
When both the camera and the scene are still, an empty-looking screen is normal.
The sensor structure and principle, and how it differs from an RGB camera, are explained with diagrams and video in the Event Camera (EVS) White Paper.
Cat6 LAN cable, PoE+ or external 12–24 V supply (see the camera datasheet)
Recommended PC
Item
File playback only
Live tracking (recommended)
CPU
x86-64, 4 cores, AVX2
6–8 cores or more, single-core boost of 4.5 GHz or higher
Memory
8 GB
16 GB
Storage
20 GB free on an SSD
NVMe SSD, 250 GB or more (for recordings)
Network
None
A 2.5GbE port for the camera only
GPU
Not needed
Not needed (an NVIDIA GPU only for the AI detection option)
Monitor
Optional
1920 × 1080
Processing speed depends on single-core speed more than on the number of cores. On a slower PC the software lowers its own workload and keeps running instead of stopping (see "DEGRADE" in chapter 11).
Performance
Item
Value
Basis
Tracking update rate
100 Hz (10 ms)
Measured
Tracking processing time
p95 3 ms
Measured
Live processing limit
9.8 M events per second, no loss
Measured
Super slow motion virtual frames
10,000 fps (0.1 ms apart)
Measured
Dynamic range
Over 120 dB
Sensor specification
Pixel latency
100 µs or less @ 1000 lx
Sensor specification
A Windows version is in preparation. For now, use Ubuntu 22.04.
3. Set-up and connection
3.1 Mounting the camera
Fit the lens and fix the camera on a tripod or bracket so that it does not shake. A shaking camera produces events across the whole scene and makes tracking hard.
Choose a distance at which the target looks large enough on screen. Boxes appear for moving targets of roughly 24 px or more.
Focus as described in chapter 9.
Lens
Field of view (H × V)
Height covered at 3 m
5 m
10 m
6.5 mm
51° × 30°
1.6 m
2.7 m
5.4 m
8 mm
43° × 25°
1.3 m
2.2 m
4.4 m
3.2 Network
Connect the camera directly to a 2.5GbE port on the PC. Avoid sharing the port or switch with other devices.
Turn on jumbo frames (MTU 9000) on that port. Find the port name with ip link.
ip link                                              # find the port the camera is on (e.g. enp3s0)
sudo ip link set dev enp3s0 mtu 9000                 # for this session
nmcli connection modify "<connection name>" 802-3-ethernet.mtu 9000   # keep after reboot
The camera and the PC must be on the same subnet. Check or change the camera IP with IpConfigUtility or ArenaView from the LUCID Arena SDK.
It also ran without errors at MTU 1500 up to 10 M events per second, but 9000 is recommended for headroom.
3.3 Software
PC installed by FLOYD: go straight to chapter 4.
New PC: install Ubuntu 22.04, then the LUCID Arena SDK (camera driver), then the FLOYD installation package. Follow the instructions in the package and run the set-up check at the end.
~/evs-venv/bin/evs-env check # check install paths and libraries
To type shorter commands, add the program folder to PATH. The examples in this manual assume this and write evs-demo.
Check — tests the environment, the camera connection, event reception and recording start in turn. Without a camera it stops after the environment checks, which is also normal.
evs-demo check
Live tracking — a window shows the camera picture and the tracking results. With several cameras, pick one with -s <serial number>.
evs-demo live
Record — press r in the live window to start or stop recording. To record from the start:
Run log log.txt, summary summary.json, screenshots, CSV results
runs/<date_time>_check/checklist.json
Check results
runs/recordings/
Recordings recording_<YYMMDD_HHMMSS>.raw
runs/ is created under the folder you run the command in. Add -o <folder> to save elsewhere.
5. Reading the screen
Tracking marks
Mark
Meaning
Coloured box
A moving object being tracked
#number
Object ID — the same target keeps the same number
px/s
Speed on screen (pixels per second)
Coloured line
The path travelled
Arrows
Direction and size of motion (colour = direction, see the colour wheel at bottom right)
Dashed box
A candidate not yet confirmed
Status lines at the top
Line
Contents
1
Mode (LIVE / REPLAY) · file name · replay speed · time t · update rate (Hz) · display fps
2
ev events per second (Mev/s = million per second)
3
ms time per processing stage and total · backlog time behind · drop amount discarded — 0 is normal
4
tracks confirmed · candidate · briefly hidden objects, number of arrows
Views
Number keys change the kind of picture. Choose up to two to see them side by side; press the same key again to remove one.
Key
View
Use
1
Events
The default. Pixels that got brighter or darker, as dots
2
Cells
Grid cells where events gather
3
Filter mask
Events removed as noise
4
Time surface
Recently changed places are brighter — good for seeing the flow of motion
Events view (left) and time surface view (right) side by side
Keyboard
Key
Action
q / Esc
Quit
Space
Pause · resume
r
Start · stop recording (live only)
p
Save a screenshot (PNG in the run folder)
t
Show · hide boxes
i
Show · hide IDs
l
Show · hide trails
f
Arrows: grid → per object → off
n
Show · hide unconfirmed candidates
h
Show · hide the status lines
1 ~ 4
Choose views (table above)
< / >
Zoom out · in
k
Light flicker filter on · off (chapter 10)
[ / ]
Halve · double the event rate limit (chapter 10)
x
Reset tracking
Control window
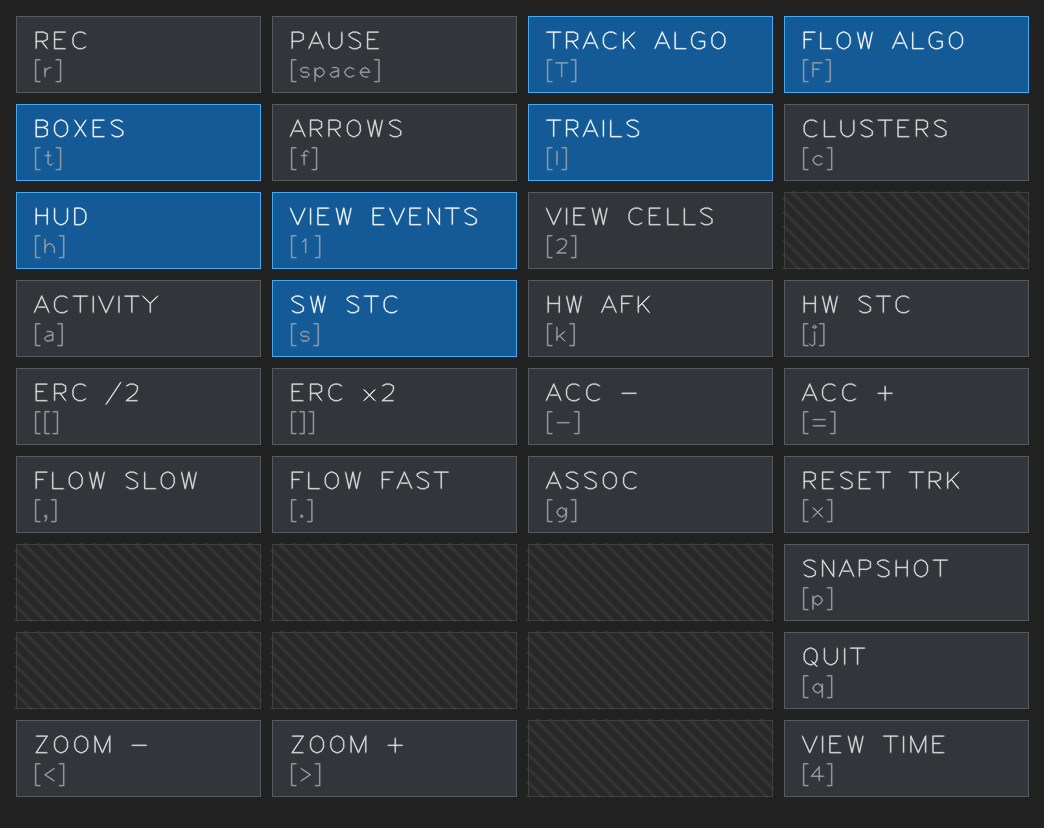
When live view or playback starts, a control window (Control) opens next to the video window. Clicking a button is the same as pressing the key shown in [ ] under it, and blue buttons are the functions that are on now.
Control window — blue buttons are on. Hatched cells are advanced or development functions not covered in this manual (leave them at their defaults)
Button
Key
What it does
REC
r
Start · stop recording (live only, chapter 6)
PAUSE
Space
Pause · resume
TRACK ALGO
T
Tracking on · off (turning it off resets tracking)
FLOW ALGO
F
Motion (flow) computation on · off — needed for the arrows
BOXES · ARROWS · TRAILS
t · f · l
Show boxes · arrows · trails (Tracking marks in chapter 5)
CLUSTERS
c
Show event clusters, the step before tracking
HUD
h
Show · hide the status lines
VIEW EVENTS · CELLS · TIME
1 · 2 · 4
Choose views (views table above, up to two side by side)
ACTIVITY
a
Noise filter that removes isolated points with no neighbours (software)
SW STC
s
Change the software noise filter mode — each press: off → cut → keep → trail
HW AFK
k
Light flicker filter (in the camera, chapter 10)
HW STC
j
Noise filter in the camera on · off
ERC /2 · ERC x2
[ · ]
Halve · double the event rate limit (chapter 10)
ACC − · ACC +
- · =
Shorten · lengthen the time events are gathered into one picture (accumulation time) — short for fast objects, long for slow ones
FLOW SLOW · FLOW FAST
, · .
Switch the flow settings between slow-motion and fast-motion use
ASSOC
g
Switch between two ways of linking objects from frame to frame — try it when IDs change often
RESET TRK
x
Reset tracking
SNAPSHOT
p
Save a screenshot
ZOOM − · ZOOM +
< · >
Zoom out · in
QUIT
q
Quit
Settings in the control window apply only to the current run. If in doubt, press RESET TRK or start again with the defaults.
6. Recording and playback
Recording
How
Command
Whenever you like during live view
Press r in the live window (press again to stop)
From the start
evs-demo live --record
For a set time
evs-demo record --duration 30 (30 seconds)
Files are saved as runs/recordings/recording_<YYMMDD_HHMMSS>.raw, with the capture settings in a .json of the same name.
A recording keeps the raw events from the camera, so you can change display and tracking settings later when you play it back.
Size depends on the scene: about 0.4 GB per minute for people walking indoors, and about 1.5 GB per minute at the highest event rate (about 10 M per second).
Playback
evs-demo replay <file>                           # real-time speed
evs-demo replay <file> --replay-factor 0.5       # half speed (0 = as fast as possible)
evs-demo replay <file> --process-from 2000000 --process-to 5000000   # only 2 s to 5 s (µs)
Playable files: .raw (recordings from this kit), .dat, .hdf5.
7. Saving results (CSV)
Save the tracking results (boxes) as CSV for use in Excel, Python and so on. For fast processing without a window, add --no-display --replay-factor 0.
evs-demo replay <file> --output-bbox-npy boxes.npy --output-bbox-csv boxes.csv
evs-demo replay <file> --output-bbox-npy boxes.npy --output-bbox-csv boxes.csv --no-display --replay-factor 0   # no window, full speed
evs-demo live --output-bbox-npy boxes.npy --output-bbox-csv boxes.csv                                           # save during live view
In this version, --output-bbox-csv writes a CSV only together with --output-bbox-npy (a NumPy file with the same contents is created as well).
A plain file name saves into this run's folder (runs/<date_time>_<command>/).
boxes.csv columns
Column
Meaning
Unit
t
Time
µs (from the start of the recording)
x, y
Top-left corner of the box
px
w, h
Box width and height
px
class_id
Class number (0 without AI detection)
–
track_id
Object ID (the #number on screen)
–
class_confidence
Tracking confidence — rises the longer an object is tracked steadily
Raw data behind the motion arrows: x,y,polarity,timestamp,vx,vy,feature_id,center_x,center_y
--output-metrics metrics.jsonl
Per-update statistics such as event count and processing time (one JSON per line)
--roi X Y W H
Process only part of the picture
8. Super slow motion
Events are redrawn as frames 0.1 ms apart (a virtual 10,000 fps) and shown next to what a 30 fps camera would have captured. Moments that a normal camera catches in one or two frames — a fast fall, a spin, an impact — can be seen in detail.
Left: as a 30 fps camera would capture it (33 ms exposure) · Right: EVS 10,000 fps frame of the same moment
evs-demo slowmo <file> --start 1.0 --duration 0.3        # 0.3 s from 1.0 s into the file
evs-demo slowmo --live --capture 0.5                     # live: press c in the preview to slow down the last 0.5 s
evs-demo slowmo <file> --start 1.0 --duration 0.3 --out clip.mp4 --stride 10   # save as MP4
A 0.3 s clip is 3,000 frames. With --stride 10, one frame in ten is kept → 300 frames (a 10 s video at 30 fps).
Slow-motion factor = 10,000 ÷ (30 × stride). With stride 1 it plays about 333 times slower.
Key (player)
Action
Space
Pause
, / .
One frame back · forward
[ / ]
Slower · faster
r
Back to the start
v
30 fps comparison on · off
s
Save the current frame as PNG
q
Close
9. Focusing
An event camera cannot see a still picture, so you blink a focus pattern on a monitor and focus while the camera watches it.
On another PC or monitor, open the focus pattern page. Choose Siemens star (default) or slanted edge; click the screen to blink it full screen at 10 Hz.
Set the monitor brightness to 100% and display scaling to 100%, and turn off automatic brightness and dynamic contrast.
Place the camera square to the monitor so that the pattern is large in the middle of the picture.
Run the focus tool.
evs-demo focus --pattern star
A score bar appears. Turn the lens focus ring slowly and lock it where the score is highest.
Key
Action
s
Save the current image (PNG) and score (JSON)
r
Reset the accumulation (after turning the lens a lot)
q
Quit
Pattern page address: https://floyd.kr/manual/rovi-evs/focus.html. On a 60 Hz monitor, blink at a divisor of 60 such as 5, 10 or 15 Hz.
10. Scene tips
Situation
What to do
Dots all over the screen under fluorescent or LED lights
The camera is seeing the light flicker that eyes cannot. Press k to turn on the light flicker filter (removes the 100 · 120 Hz band).
The PC cannot keep up (backlog and drop rise)
Press [ to halve the event rate limit (default 10 M per second). Processing only the needed area with --roi also helps.
Unwanted motion such as leaves or water
Process only the area of interest with --roi X Y W H.
A target gets no box
It may be too small (under about 24 px) or too slow. Move closer or change the lens. Press n to see unconfirmed candidates.
The camera rides on a vehicle or robot
The whole background looks like motion. This version assumes a fixed camera.
Because an event camera sees changes in brightness, it catches motion well in dark or backlit scenes. In total darkness, though, there is no change to see.
11. Troubleshooting
Symptom
What to check
check does not see the camera (devices: (none))
Cable and power (camera LED), same subnet (3.2), Arena SDK installed, no other program such as ArenaView using the camera
No window opens (remote session etc.)
Run from the desktop, or run with --no-display and save CSV only
DEGRADE at the top
The PC reached its limit and the software lowered its workload. Lower the event rate limit ([), close other programs and check MTU 9000.
drop is not 0
As above. Recordings hold the camera's raw events, so you can play them back and process them again later.
The whole picture shimmers
Light flicker (k) or camera shake
r does not record
Recording works only in live view (not during playback).
Playback too fast or slow
Check --replay-factor (1 = real time)
The focus score does not rise
Is the pattern blinking, is the monitor at 100% brightness, is the pattern large in the middle of the picture?
If a problem continues, contact us with runs/<date_time>_<command>/log.txt and the evs-demo check result (checklist.json) attached.
For evaluation kit loans or application reviews (high-speed falling-object counting, tracking moving objects in backlight or low light, and so on), send us a review request and we will get back to you.